'Tis the season to be jolly. And also, to get crafty. If you're starting to think about decorating the Christmas tree this year, why not make your own tree decorations? Over the next couple of weeks, we'll be showing you how to make London Christmas tree ornaments, such as this felt London bus.

You will need
- Red felt (we've gone for glittery red felt here for an extra Christmassy touch — plain felt will work just as well)
- White felt
- Black felt (enough for tyres)
- Grey felt (enough for hub caps)
- Bus template (provided)
- Silver thread
- Black thread
- Needle, scissors, black pen, pins
Time required: 90 minutes
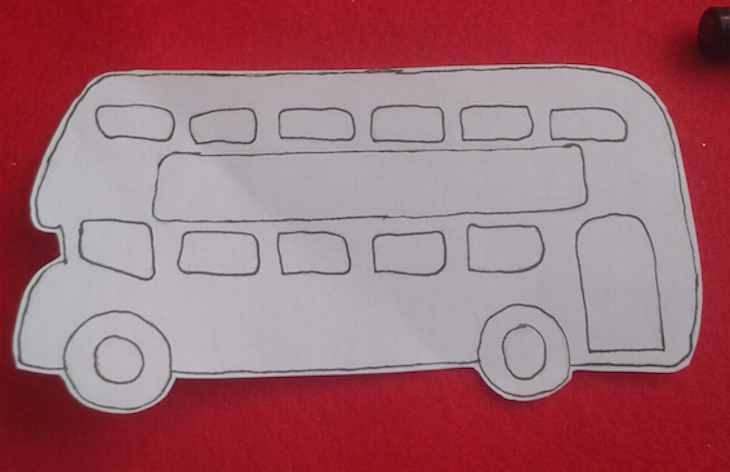
Step 1: Print off the bus template above (or draw your own) to the size you want your decoration to be. Ours is around 13cm x 7cm — if you go much smaller than this it'll be fiddly to cut out. At the same time, don't make it too large (or heavy) for your Christmas tree. Cut out the windows and door from the template.

Step 2: Use a dark pen to trace around the outline of the bus and the windows onto the red felt. Do this twice, so that you have two buses of the same size. If you are using single-sided felt such as glittery felt, remember to flip the bus over so that your buses pair up.

Step 3: Cut out both buses, leaving approximately half a centimetre of red felt around the edge of each. Cut out the windows and doors.

Step 4: Cut out four circles from the black felt for the wheels.
Step 5: Cut out four smaller circles from the grey felt for the hub caps. Attach these to the centre of the black wheels. This can be done either be sewing them on with silver thread, or by using glue dots.

Step 6: Using black thread, sew the wheels onto the buses.

Step 7: Place the buses back to back, with the white felt in between. Sew around the edges using silver thread, securing all three layers together. It can be tricky to keep them lined up while you sew, so it might help to use pins to secure them as you sew.
Step 8: Once you have sewn all the way around the edges, remove the pins you've used to secure it. Trim around the edge of all three layers so that the white felt doesn't stick out beyond the red layers.
Step 9: Add a hanging ribbon by piercing a hole through the top. And you're done! Hang it on the tree and admire your fine handiwork!